First, a standard frame based layout shall be discussed. Below that, there is an example of the use of Internet Explorer Floating Frames
For the purposes of this example, the layout of an imaginary frame based HTMLib (actually the first version of the HTML based HTMLib) will be used for discussion. Firstly, the main document setting up the framed display shall be explained, then a more detailed examination of the use of the TARGET and NAME attributes shall be looked at.
The initial page that sets up the framed display is called index.htm and looks like this :
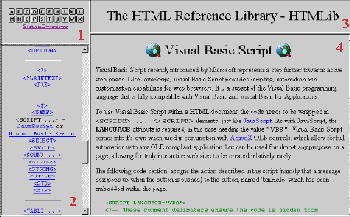
The framed layout it generates can be seen below
<HTML>

<HEAD>

<TITLE>The HTML Reference Library - HTMLib</TITLE>

</HEAD>

<FRAMESET COLS="25%,*"> 1

  <FRAMESET ROWS="100, *"> 2

3 <FRAME SRC="buttons.htm" NORESIZE SCROLLING="no" NAME="buttons">

4 <FRAME SRC="qr.htm" NORESIZE SCROLLING="yes" NAME="QR">

  </FRAMESET> 5

  <FRAMESET ROWS="75, *"> 6

7 <FRAME SRC="title.htm" NORESIZE SCROLLING="no" NAME="TITLE">

8 <FRAME SRC="intro.htm" NORESIZE SCROLLING="auto" NAME="main">

  </FRAMESET> 9

</FRAMESET> 10

</HTML>
Each line has been labelled with a number. This is for the following line by line breakdown:
1 <FRAMESET COLS="25%,*">
This line splits the viewing window into two vertical sections, the first being 25% of the viewing window and the second column comprising of the rest of the available window space. This is the same as using <FRAMESET COLS="25%","75%">
2 <FRAMESET ROWS="100,*">
This line specifies a frameset that is inside the first vertical column specified in line 1. It divides the column into two horizontal sections, the top section being 100 pixels high, the lower section using the rest of the available viewing window.
3 <FRAME SRC="buttons.htm" NORESIZE SCROLLING="yes" NAME="buttons">
This is the first FRAME element in the document. It specifies the contents of the top frame defined in line 2 as being the file buttons.htm (which lays out the buttons for accessing the Quick Reference sections easily). This frame is set to not allow resizing and is allowed to use scroll bars whenever necessary.
4 <FRAME SRC="qr.htm" NORESIZE SCROLLING="yes" NAME="QR">
Like line 3, this line specifies a document called qr.htm (the document containing the quick reference look up information) to be the contents of the lower frame defined in line 2. As with the above definition, the frame can not be resized and is allowed scroll bars where necessary. It has been named QR. All the links in the file buttons.htm (the file used in the above section) use TARGET="QR" attributes to enable the button graphics to link to certain sections of the file qr.htm.
5 </FRAMESET>
This line closes the FRAMESET definition opened in line 2
6 <FRAMESET ROWS="75,*">
This line (similar to line 2) defines the horizontal division of the right hand frame defined in line 1. It splits it into two section, the top being 75 pixels high and the lower section comprising of the rest of the available viewing space.
7 <FRAME SRC="title.htm" NORESIZE SCROLLING="no" NAME="TITLE">
This line (similar to line 3) specifies the file to be used for the contents of the top section as defined in line 6. The file is title.htm (which contains the ever present 'site' title). This time, the section has been set to be non-scrollable. It is not a problem if some of the title is missing due to an altered viewing area (at least not that much of a problem).
8 <FRAME SRC="intro.htm" NORESIZE SCROLLING="auto" NAME="main">
This line (similar to line 3) specifies the contents of the lower section of the frame defined in line 6. This has been named main and is the main window for the content of the 'site'. Its scrolling attribute has been set to "auto" as some topics will be bigger than others, requiring scrolling, but where the topic is small enough to fit in the window, scroll bars will not be displayed, maximising the space available to the frame.
9 </FRAMESET>
This line closes the FRAMESET definition opened in line 6
10 </FRAMESET>
This line closes the initial FRAMESET definition opened in line 1
The following diagram can be used to show how the TARGET and NAME attributes are used within the frame set up of this 'site'.
The section labelled 1 is NAMEd "buttons". All of its links use TARGET="QR" in them, to specify that the documents to be loaded by the link (all of the graphics are links) are to be loaded into the frame section that is NAMEd "QR", which in this case is the frame labelled 2.
For example, the button 'M' in the top section, has the following as its link:
<A HREF="qr.htm#QRM" TARGET="QR">

<IMG SRC="images/m.gif" BORDER="0" WIDTH="17" HEIGHT="17" ALT="M">

</A>
which specifies that the document qr.htm#QRM (in this case, the fragment of qr.htm that has been set as <A NAME="QRM">) is to be loaded into the frame NAMEd "QR" (the section labelled 2) when the graphic 'M' is clicked on.
The section labelled 4 is NAMEd "main". All of the links from the file "qr.htm" (displayed in the frame labelled 2) use TARGET="main" in them, so that activating any of the links in the Quick Reference, will load the required document into this window. All of the links in documents that appear in this window do not use any TARGET attributes, which means that any documents they load will be loaded on top of the one containing the link.
Most care should be taken when using external links within a framed set up. If you don't specify a TARGET using one of the special reserved names (see Frames), or set the TARGET to use a name not specified anywhere in your frame set up then the new document will be loaded into whichever frame of your own frame layout the link originated from. If the external target is also a framed document, this can get exceedingly messy.
By far the best way to avoid this 'frame retention' is to always use TARGET="_top" in all links of your site that link to documents external to your own site. That way, the browser will load the document you have linked to, in a clean window, removing all of your frame set up first.
Floating frames
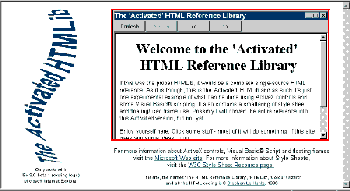
The Internet Explorer allows floating frames to be used within standard documents. To do this, it only requires that a frame be employed within a standard HTML document. For example, for the main interface to the 'Activated HTMLib' section of the HTMLib web site, a floating frame is specified for all of the subsequent HTML documents (both framed and normal) to be displayed in.
The HTML used to do this is :
<IFRAME NAME="content_frame" width="488" height="244" SRC="welcome.htm"></IFRAME>
This sets the frame as being called "content_frame" and being initially loaded with the file "welcome.htm" . The WIDTH and HEIGHT attributes serve to set the size of the frame within the page. The image below shows the resulting floating frame (highlighted with a red border)

© 1995-1998, Stephen Le Hunte
Comments:
Code:
| file: /Techref/language/html/ib/Frames/example.htm, 10KB, , updated: 2009/3/26 09:38, local time: 2025/10/19 05:25,
216.73.216.53,10-2-207-162:LOG IN
|
| ©2025 These pages are served without commercial sponsorship. (No popup ads, etc...).Bandwidth abuse increases hosting cost forcing sponsorship or shutdown. This server aggressively defends against automated copying for any reason including offline viewing, duplication, etc... Please respect this requirement and DO NOT RIP THIS SITE. Questions? <A HREF="http://techref.massmind.org/techref/language/html/ib/Frames/example.htm"> Frames examples</A> |
| Did you find what you needed? |
Welcome to massmind.org! |
|
Ashley Roll has put together a really nice little unit here. Leave off the MAX232 and keep these handy for the few times you need true RS232! |
.