|
Circuit explanation of the dancing lights controller |
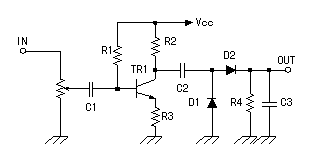 There are following functions in the signal input circuit. The level of the signal can be adjusted with the variable resistor(Installed at the case). It adjusts for the lamp to flash beautifully with the level of the external signal. The voltage is amplified with the transistor. When the voltage of the input signal is high, this amplifier is unnecessary. As for the detailed explanation of the transistor amplifier which was used this time, refer to "The circuit design of the current feedback bias type transistor amplifier". It makes the DC voltage which changes according to the level with the input alternating voltage. Rectifying the alternating voltage in the half wave with D2 and its making the DC voltage. The central voltage of the signal becomes high(About 0.7 V) with the forward voltage of the diode(D1). The small voltage signal rectification operation by D2 doesn't work successfully when there is not this diode. R4 is the resistor to lower the DC voltage when the level of the input signal falls. Because the change of the input signal is intense, the relay to drive the lamp doesn't work normally just as it is. Therefore, it makes the change of the DC voltage slow by C3. The flash condition of the lamp can be adjusted by the value of R4 and C3.
The adjustment of R4 and C3 is quite troublesome. The change of the DC voltage changes with the voltage of the input signal, the kind (the voice, the music) of the signal and so on. I think that it is better that you don't become too nervous with the setting of these values. In case of the value which was used this time, the operation is quick a little. The output of the signal amplification circuit changes in 12Vp-p. So, the rectified signal sometimes becomes 6Vp-p. The circuit this time works at the +5V voltage because it is using the TTL circuit. The more than +5V voltage doesn't apply to the voltage comparator using the +5V Zener diode (D3). When I measured, it never exceeded +5 V. This may be the unnecessary circuit. Vp-p(The peak to peak voltage) is the potential difference of the most low and the most high voltage with the alternating voltage. In case of AC 100 V, the RMS(Root Mean Squared value) of the half cycle is 100 V. The peak voltage of the half cycle is 141 V(a square root 2:1.41 times). Next half cycle, the maximum is 141 V at the voltage of the opposite polarity. So, the peak to peak voltage of AC 100 V is 282Vp-p.  The level detection by the voltage which is output from the signal input circuit using the voltage comparator is done. The reference voltage(Vr) is applied to the negative input and the DC voltage(Vin) which changed the input signal is applied to the positive input of the voltage comparator. When the input signal becomes above Vr, the output of the voltage comparator becomes the H level (+5V) and below Vr, it becomes the L level (0V). By adjusting Vr, the output of the voltage comparator can adjust the changing input level. The circuit this time can control the lamp by the four levels using the four voltage comparators to be independent. More levels can be set if increasing the number of the voltage comparators. However, there is a way of connecting the fixed resistors in series, dividing the voltage and making the reference voltage, too. The equal reference voltage can be made with the way. But, in the case, the reference voltage can not be changed. 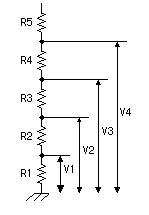 Each reference voltage when using the five resistors of the equal value is as follows. R1 to R5 = 1K-ohm V1 = 5V x (R1)/(R1+R2+R3+R4+R5) = 5V x 1/5 = 1V V2 = 5V x (R1+R2)/5 = 2V V3 = 5V x (R1+R2+R3)/5 = 3V V4 = 5V x (R1+R2+R3+R4)/5 = 4V In case of LM319, the output is the open collector. So, +5 V is connected through the resistor to become +5 V in the H level output. When not putting the resistor, the power supply is connected with the output of LM319 directly when the output is the L level and LM319 breaks. 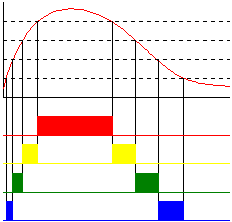 I made the circuit which chooses only one output which detected the maximum level of the output of the voltage comparator. I made the circuit which chooses only one output which detected the maximum level of the output of the voltage comparator.When not using this circuit, the lamp of the level below it lights up too including the maximum level. Even if it doesn't use this circuit, there is no problem. But, when not using, following circuit change is necessary. It cuts the line which connects the NAND output of the high level detector and the NAND of the low level detector. Then, the input of the NAND is connected to the input of the NAND of the low level detector.
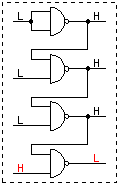
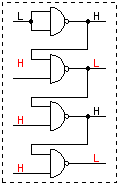
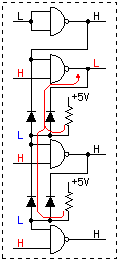
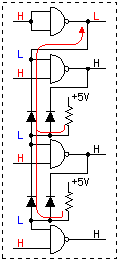
At first, I was thinking of the operation image like the figure above. However, it didn't become so. The operation of the circuit is as the assumption of me to the 1st level and the 2nd level but the 3rd level and the 4th level are different.
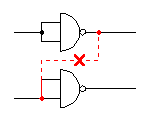
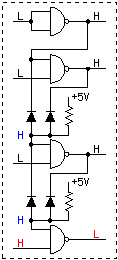
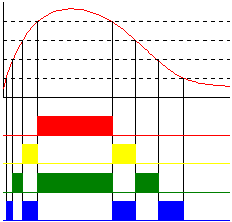 That is, two outputs become ON in the 3rd level and the 4th level. Because the lamp is not in only one piece of the necessity at the equipment this time, I don't change the circuit. When you want to make only the LED with the maximum level lights up, you need to use the 3 input and 4 input NAND gates. The mounting space of the parts become necessary much when using the multiple input NAND. So, the AND gate circuit which used the diode is convenient. 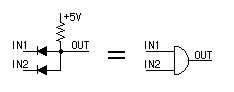 The figure on the left is the simple AND gate circuit which used the diode. The figure on the left is the simple AND gate circuit which used the diode.Only when both of IN1 and IN2 are the H level, OUT becomes the H level. But, because this circuit isn't revising the voltage, it can not connect the many circuits in series. The forward voltage drop of the diode is about 0.7 V. So, when connecting the 3 circuits in series, OUT becomes about 2 V in the L level. There is no problem in increasing the number of the input. You can make the 20 inputs AND gate or the 100 inputs AND gate or more. I show the circuit to light up only the LED of the highest rank level using the AND gate by the diode by below.
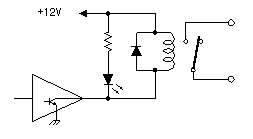 I used the 74LS07 buffer IC to control the operation of the relay. This IC is the open collector type. The collector of the transistor for the output inside the buffer becomes open(It isn't connected inside). Because it is, the circuit that the voltage is not +5 V can be controlled. The maximum voltage which it is possible to control is +30 V. There is 74HC07 in the function which is the same as 74LS07. However, in case of 74HC07, because the electric current which can pour into the output is 4 mA, it isn't possible to use for the relay control. In case of 74LS07, it is possible to pour in 40 mA. I used the 74LS07 buffer IC to control the operation of the relay. This IC is the open collector type. The collector of the transistor for the output inside the buffer becomes open(It isn't connected inside). Because it is, the circuit that the voltage is not +5 V can be controlled. The maximum voltage which it is possible to control is +30 V. There is 74HC07 in the function which is the same as 74LS07. However, in case of 74HC07, because the electric current which can pour into the output is 4 mA, it isn't possible to use for the relay control. In case of 74LS07, it is possible to pour in 40 mA.The diode which connects with the relay in parallel is to protect the buffer IC from the high voltage which occurs when ON/OFF the electric current of the coil of the relay. The point of contact current-carrying capacity of the relay which was used this time is 0.6 A at AC 125V. So, less than about 40 W of the lamp which connects with the outside are safe. The circuit this time connects the point of contact with the being of the two in parallel. There is possibility that the working timing of each point of contact rather shifts. In the case, in ON or OFF, the load depends on the one point of contact. It is better not to think that it becomes twice of current-carrying capacities. It is to extend the lifetime of the point of contact that I make the two points of contact parallel with the circuit this time. The circuit this time uses the +12V power supply. Therefore, it is making +5 V for the IC using the 3 terminal regulator (78L05). The maximum output current of 78L05 is 100 mA. To work the circuit this time, it is the enough value. |