by Jinx (copied with permission from http://home.clear.net.nz/pages/joecolquitt/stepper_as_encoder.html)
A stepper motor can be used as an encoder. As the rotor is turned, its movement
past
the coils induces a voltage in them. Much as the motor is driven by energising
the coils
in a particular sequence or pattern, so the induced voltages appear when
the motor is
used as a generator
Background reading -
Jones On Stepper
Motors
These voltages can be used as a measure of step direction and rotational
speed
The waveform from a stepper coil is poorly-defined at low speed and
single-stepping
However, by slightly energising the coils, the waveform can be dramatically
improved
This picture shows the difference. Traces are on the same voltage
scale
(Note - the waveforms were captured using the computer's soundcard)
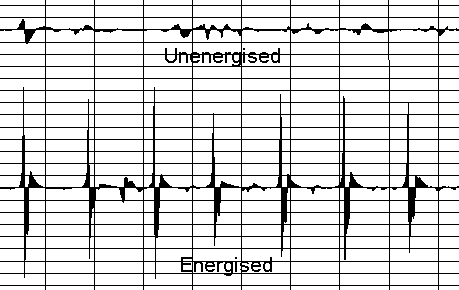
'Unenergised' - the voltage measured is from simply turning the rotor. Step
pulses are there
but indistinct
'Energised' - approximately 6mA of DC is passed through one coil of a bipolar
motor. The
pulses are what appear on the other. Previously hidden amongst the noise,
they are now clear.
Additionally, the energising introduces an amount of cogging or detent, ie
the rotor is less
free-running. This enhances the stepping 'feel' and helps produces sharper
and higher pulses
by momentarily causing an increase in speed of the rotor as it passes the
pole
Taking this further, both coils are energised with a few mA of
current
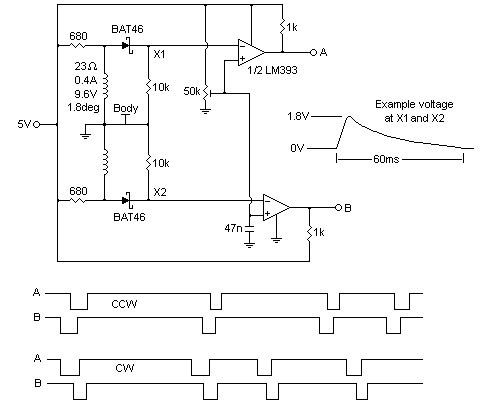
Each step of the rotor produces a voltage, as shown, measured at 'X1' or
X2. Note that, as
mentioned above re sequencing, the voltage produced at X2 will follow or
precede that at X1,
depending on which way the rotor is turning. '60ms' will decrease as the
turning speed increases
and is just an example at a step rate of about 2Hz
If X1 and X2 are taken to a comparator, the trimpot is set for a normally
high output that
goes low when the input on the -ve pin goes above that on the +ve pin. The
result is a logic-
level quadrature signal that can be interpreted by a micro. The time difference
between leading
edges of A and B pulses can be as low as a few hundred microseconds or as
high as several
milliseconds, depending on rotational speed and effectiveness of the motor
as a generator.
Alternatively, the voltages at X1 and X2 can be measured directly by a micro's
ADC or internal
comparator
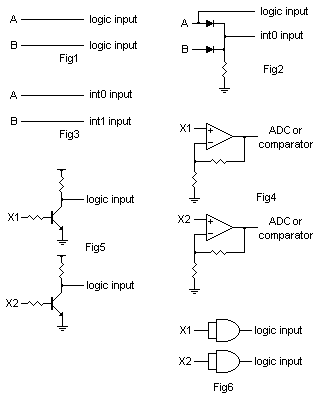
Interface suggestions
In Fig1, A and B are taken to inputs which are polled, as program flow has
time for. If speed
measurement is important, then a more immediate reaction to a new pulse may
be desirable.
An interrupt can be enabled to do this. For micros with just one INT pin,
the diode OR-ing
of Fig2 will cause an interrupt - or at least INT0IF to be set - on either
A or B going high
or low (INTEDG sets the polarity-change trigger). The two pins can then be
examined to find
which caused the interrupt, that one being the leading pulse. A pull down
is required to stop
INT0 floating high when the comparator goes low. >10k should work. Micros
with more
than one INT can use Fig3. Speed is measured by timing the interval between
pulses on the A
or B line
10k is not an overly high source impedance, and pulse detection is the goal
rather than
accurate measurement of the voltage produced. A buffer/amplifier of Fig4
could be used,
or the 10k resistors reduced. With this particular motor, a 1k resistor results
in an X1/X2
voltage of around 1V, which is still adequate for reliable
processing.
Fig5 shows how the X1/X2 analogue voltages are converted to logic. This
arrangement
will invert the signal. ie the collector of the transistor will be normally
high and go low
when the transistor turns on with a sufficient voltage on its base. In Fig6,
voltages may
be high enough to meet the Vin threshold of some logic families.
The technique has been tested on many types of stepper motor and works well.
The user needs
to consider the coil resistance and voltage rating. For example, one motor
tried was a 24V, 7.5
degree unipolar with centre-tapped 190 ohm coils. To get performance similar
to that above, a
12V supply was needed. However, this was with the 680 ohm resistors. With
lower resistors,
5V would work. The point being that much of the above circuits and software
to interpret the
signals and voltages can be customised to suit any particular motor or
application
Acknowledgements
M. Adam Davis for suggesting energisation -
Micro Basics
The PICList -
PICList home
page
| file: /Techref/io/sensor/pos/enc/stepper_as_encoder.htm, 5KB, , updated: 2008/12/6 18:37, local time: 2025/10/26 09:14,
216.73.216.180,10-8-63-169:LOG IN
|
| ©2025 These pages are served without commercial sponsorship. (No popup ads, etc...).Bandwidth abuse increases hosting cost forcing sponsorship or shutdown. This server aggressively defends against automated copying for any reason including offline viewing, duplication, etc... Please respect this requirement and DO NOT RIP THIS SITE. Questions? <A HREF="http://techref.massmind.org/techref/io/sensor/pos/enc/stepper_as_encoder.htm"> Stepper Motor, Rotory Encoder</A> |
| Did you find what you needed? |
Welcome to massmind.org! |
|
The Backwoods Guide to Computer Lingo |
.