 Width setting of the pattern (Class) Width setting of the pattern (Class)
In the print pattern, the width of the pattern should be changed by the kind of the wiring. The pattern width of the power and the ground makes it wide according to the electric current. The width of the pattern can be set when drawing it. However, it is possible to make draw a pattern with necessary width automatically by setting beforehand. "Class" is used to pre-set the width of the pattern.
 Setting of Class Setting of Class

Select "Net classes..." from Edit of the menu bar in the schematic window. The window of Net classes like the left is opened.
In the initial state, only default is set as Class0. A maximum of eight kinds of classes can be set.
In the example below, it makes Class1 the class of the ground wire, "gnd" is set as the name, 36mil(0.036inches:0.9mm) is set as the pattern width and 10mil(0,01inches:0.254mm) is set as the minimum pattern interval(Clearance). Also, it makes Class2 the class of the power, it sets a name to power, "power" is set as the name, 24mil(0.024inches:0.6mm) is set as the pattern width and 8mil(0.008inches:0.2mm) is set as the minimum pattern interval(Clearance).
"mil" is 1/1000 inches. The value which is set in DRC(Design Rule Check) is used for Class0. It is not 0mil. The class which is chosen in "Nr" in the left end is used as the original value of Net class which is displayed with the Net icon.
Designation of Class
I use a circuit below as the example.
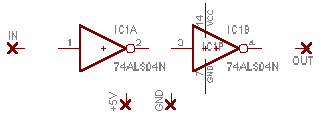
 To wire using Class, Net should be used. To wire using Class, Net should be used.
When pushing "Net" icon, the following bar is displayed on the top of the circuit window.

You can select the class of the wiring in the part of "Net class". Select class0 as the signal, select class1 as the power, select class2 as the ground and wire them.
In the schematic, the thickness of the wiring isn't displayed.
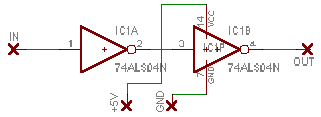

You can confirm the attribute of the wiring with the Info icon.
The attribute of the power line is displayed when putting a mouse pointer on the line from +5V to Vcc and clicking it.
 |
The width which is shown in this window is the thickness of the line on the schematic and is not the width of the pattern. |

A pattern is automatically drawn when creating a board and pushing an automatically wiring (Auto) icon after parts arrangement.
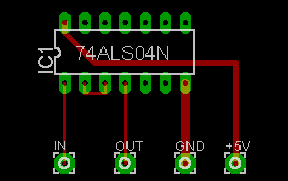 |
You can find that signals are wired with thin wires, the power is with thicker and the ground is with the thickest wire.
The signal wires are drawn in 10mil. |
Let's confirm the width of the pattern using the Info icon.
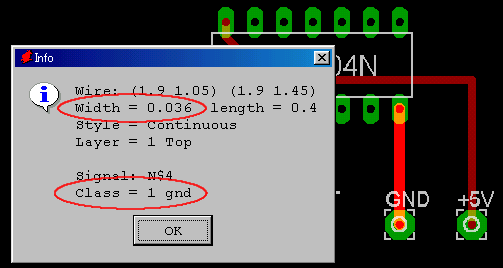 That the ground is Class1(gnd) and the width of the pattern is 0.036 inches (36mil) is confirmed.
When wiring using Net Class, the important point is to do the wiring to have specified a class on the schematic before creating a board chart from the schematic.
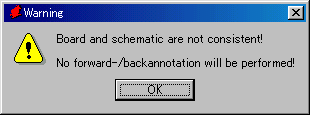
Even if it is wired by the specification except the default class with the schematic after creating a board, the class of the default is applied to the board. In this case, the mismatching of the schematic and the board chart occurs and since it, it isn't possible to draw a pattern normally. The contents of the error can be confirmed when executing ERC(Electrical Rule Check).

The message above shows Net Classes which differs on schematic and board as net or signal is used.
The GND is a net name, 1 is a class number on the schematic and 0 is a class number on the board. |
When becoming such a condition, it specifies default class (0) on the schematic and it changes the thickness of the wiring manually after that. Or, it closes a board window and it creates a board newly again from the schematic. In this case, it is necessary to relocate the parts.
|
