Circuit explanation for Battery charger
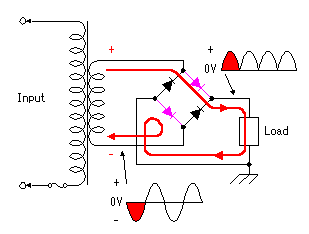 Full wave rectifier circuit with a diode bridge is used for the rectifier circuit which changes AC into DC. Even if the alternating voltage of the input changes into the positive and the negative, the voltage which is applied to load is always positive by a diode bridge. The voltage which is applied to load is not clean DC. It is called Ripple voltage. Full wave rectifier circuit with a diode bridge is used for the rectifier circuit which changes AC into DC. Even if the alternating voltage of the input changes into the positive and the negative, the voltage which is applied to load is always positive by a diode bridge. The voltage which is applied to load is not clean DC. It is called Ripple voltage.In this circuit, in order to make ripple voltage small, the capacitor is connected to load in parallel. Even if the voltage which comes out from a diode bridge becomes small, the DC voltage applied to the load is stabilized by discharge the electricity stored in the capacitor. AC100V is dropped on AC24V with a transformer. In case of the alternating current, voltage is shown in RMS(Root Mean Squared value). If it changes into direct current voltage, it will become about DC30V. 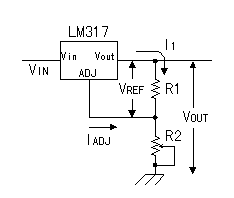 This is the circuit which controls maximum charge voltage, in order to prevent over charge of a battery. This is the circuit which controls maximum charge voltage, in order to prevent over charge of a battery.For the control circuit, 3-Terminal Adjustable Regulator (LM317) is used. A left figure is the basic circuit of the regulator. The voltage between Vout and ADJ is fixed and is 1.25V as standard. Control of output voltage is performed by the value of R2. Output voltage (Vout) is calculable by the following formula. Vout = 1.25 ( 1 + R2/R1) + IADJ(R2) IADJ is current which flows from an Adj pin and it is several 10µA. Therefore, this can be disregarded. In LM3xx, there is a condition to decide the resistance for voltage control. It's Load Regulation. The load current 10mA or more is required for normal operation of a device. Therefore, it is recommended to set the value of R1 to 120ohms or less. 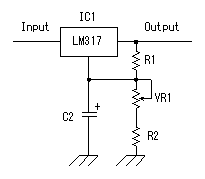 R1 is set to 100 ohms in this circuit. R2 in the above explanation turns into VR1+R2 of a schematic. R1 is set to 100 ohms in this circuit. R2 in the above explanation turns into VR1+R2 of a schematic.In an actual circuit, R2 is 560 ohms and VR1 is 2k ohms. In case VR1 is 0 ohms, the output voltage is as follows. Vout = 1.25 ( 1 + 560/100 ) = 1.25 x 6.6 = 8.25V In case VR1 is 2k ohms, the output voltage is as follows. Vout = 1.25 ( 1 + 2,560/100 ) = 1.25 x 25.6 = 32V Therefore, the output voltage of this circuit can be controlled from about 8V to 32V. Because a current control circuit is inserted behind this circuit, the final output voltage of a charger declines by 2-3V. 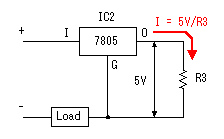 7805 is IC circuit for making voltage regularity. However this time, this IC is used as a circuit which makes current regularity. 7805 is IC circuit for making voltage regularity. However this time, this IC is used as a circuit which makes current regularity.The left figure is drawn in the style of voltage control in order to make an understanding easy. Even if it changes input voltage, 7805 operates so that the voltage between an ground terminal (G) and an output terminal (O) may be set to 5V. If a resistor R3 is connected between O-G, the current which flows into R3 will be set to I = 5V/R3. Therefore, the current which flows into R3 becomes fixed. Because the current which flows into R3 flows also into load, if the value of R3 does not change, the current which flows into load is fixed. Conversely, if R3 is changed, the current which flows into load is changeable. 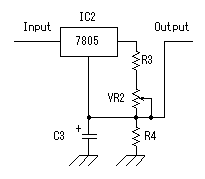 This figure is the circuit used this time. This figure is the circuit used this time.First, I decided the value of R3. In this charger, because the maximum current is set to 500mA, as R3, it is made 5V/0.5A = 10 ohms. When 500mA current flows into a 10 ohms resistor, the power consumption of a resistor is I2xR = 0.52A x 10ohm =2.5W. I am using the cement resistor of 5W in consideration of safety. Next, I calculated the value of VR2. I assumed controlling in about at least 80mA. Therefore, R3+VR2 is 5V/0.08A = 62.5 ohms. R3 was 10 ohms, so the value of VR2 was set to 50 ohms. When 80mA current flows into 50 ohms, the power consumption of a resistor is 0.082 x 50 = 0.32W. I am using the variable resister of 2W in consideration of safety. It is also possible to use LM317 for a current control circuit. However, there is a fault. In LM317, the voltage between O-G is 1.25V. In this case, the resistance for setting a current value to 500mA is 1.25V/0.5A = 2.5 ohms. It is 15.6 ohms for making it 80mA. Compared with 7805, it is a small value. Current control will become difficult if the error of resistance is taken into consideration. Moreover, if a regulator with high output voltage is used, the power consumption of the resistor for control will increase more. For example, when the regulator for 12V is used, the resistance for making it 500mA current is 12V/0.5A = 24 ohms. And the electric power consumed by the resistor is 6W. For the above reason, I am using 7805 for current control. R4 and C3 may not have necessity. In this circuit, the diode for preventing the reverse current from a battery is used. As for diode, ON state (state where current flows), and the OFF state (state where current does not flow) have clarified. If the voltage of a battery rises by charge and becomes higher than the voltage of a charger, current will not flow from a charger. Then the voltage of a battery falls by that cause and current begins to flow from a charger again. It will be oscillated if such a thing occurs for a short time. So, in order to suppress a rapid voltage change of a charger, I put C3. R4 is put in order to make C3 discharge. However, it seems that the voltage of a battery does not change so quickly in fact. Therefore, I think that it is satisfactory even if C3 and R4 do not use. 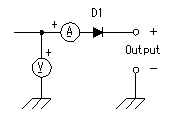 A voltmeter, an ammeter, and reverse current prevention diode are put as the output circuit of this charger. Because some current flows also into a voltmeter, it should be put ahead an ammeter. Reverse current prevention diode is for protecting that current flows backwards to a charger from a battery, when AC100V go out, where a charger is connected to a battery. |