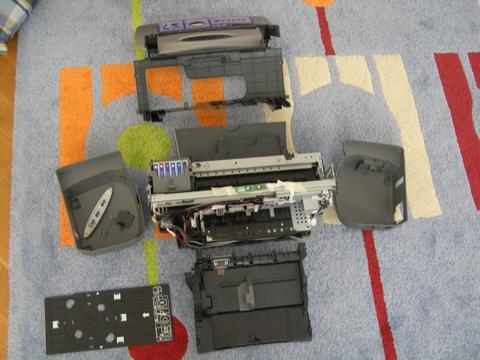
{this printer has a CD/DVD printing tray which can be used with very little modification to print a smaller PCB. Direct to PCB InkJet Resist Printing In CD/DVD printing trays}
I managed to modify Epson Photo R220 for direct PCB printing and used MISPRO yellow ink for it. I am drying the ink with my hot-air station at 400 C. It is quite clean and fast. Printing and drying is finished in 3 minutes.
I etched the PCB with Fe-Cl3.
But before printing, you should bath the PCB about 1-2 minutes in acid (H-Cl + H2-O2) to become purple-brown in color. This creates a soft surface and ink will be printed very smoothly as if it is printed onto a paper. Otherwise, ink is populated on some areas, waved in color and not evenly distributed on the PCB. This is the original contribution of mine I think :-)
Results are not as good as Volkan's results but satisfactory. There is no problem with 8 MIL traces. Problems occur if dust in air drops on the printed image while it is still wet. If printer is located in a clean box, I think every thing would be OK down to 6 or even down to 3 MIL traces.
R220 is very very easy printer to modify, since its printing head height is adjustable. I recommend it to you.
I used this one below pre-filled with MISPRO yellow. (Believed as the most etch resistant ink)
http://www.inksupply.com/spongless_carts.cfm MP-T0484-SLC $10.95
Even with MIS PRO ink, you should head clean your printer (printer does it for you) if 2 days passed. It clogs the printer head in 48 hours!

{ed: the covers come off easily, and the height of the print head can be manually adjusted to fit even standard PCB stock. Although the printer is not designed for pigment based inks, the MIS PRO yellow seems to work well enough to be useful. As mentioned, the heads will clog in about 48 hours and must be cleaned to start working again. Longer periods of disuse may cause clogging that is harder to clear. Try to seal the heads against thier resting pad when not in use. }
tristan.devans says: "Just ran an 8x10" piece of 1/32 through my modified r280 last night! 1/32 does work by just raising the set screws to their max positions. Thanks for the help!"
Comments:
Questions:
OK...got the printer apart, but I keep coming up with the status monitor asking for the CD/DVD tray to be removed and the door closed....where's the interlock???? And how do you align the PCB's for second side printing, or a second pass for solder mask and silk screen layers????
See also:
The only limitation is that it needs at least a 1" margin on the top and bottom to allow for the weave algorithm to accurately cover those parts of the image. +
| file: /Techref/pcb/etch/r220-BD.htm, 6KB, , updated: 2010/8/31 16:03, local time: 2025/10/12 22:23,
216.73.216.53,10-2-207-162:LOG IN
|
| ©2025 These pages are served without commercial sponsorship. (No popup ads, etc...).Bandwidth abuse increases hosting cost forcing sponsorship or shutdown. This server aggressively defends against automated copying for any reason including offline viewing, duplication, etc... Please respect this requirement and DO NOT RIP THIS SITE. Questions? <A HREF="http://techref.massmind.org/Techref/pcb/etch/r220-BD.htm"> PCB Resist, InkJet Printing, Epson Photo R220, by Bora Dikmen</A> |
| Did you find what you needed? |
Welcome to massmind.org! |
|
Ashley Roll has put together a really nice little unit here. Leave off the MAX232 and keep these handy for the few times you need true RS232! |
.