{this printer has a CD/DVD printing tray which can be used with very little modification to print a smaller PCB. Direct to PCB InkJet Resist Printing In CD/DVD printing trays}
I am now just finishing up my Epson Artisan 50 printer that I modified to rear load rigid and flex PCB. The mod for this printer is so very easy to do! I would say (now that I did it already) should take about 4 to 5 hrs. of easy modding.
I can now run any single sided or double sided PCB down to 2.5" x 3.5" and up to 8.5" x 22" with no carrier. I can't believe the absolute perfect double sided registration and ultra fine lines I can get with this low cost printer. I don't currently have an optical "line width" measuring device, but using a magnifier glass I am getting solid hair line traces in one pass and absolutely perfect registration in second passes.
Rip out entire front pizza wheel rollers assembly, keep bottom rubber roller assembly in place.
Rip out top paper loading assembly, cut off anything that is not vertically connected to the side attachment walls. Put back vertical wall sides and the axial gear that attaches to it.
Cut 4" in from left rear of case bottom a 1.5" tall x 9" wide from the rear bottom case. Power pack remains where it is.
Install 8" x 10" x 1/8" Plexiglas (Home Depot has this to size already) for rear feed bed.(set feed bed height with nylon spacers).
Attach two 3/4" x 1/2" x 8.5" long aluminum "L" channel to rear feed bed.(3/4" side gets glued down to feed bed).
Attaching a 2" long x 1/2" diameter round nylon extension "handle" extending the existing paper drive roller to the outside of case enables you to manually feed your PCB and make ultra fine pre-printing alignment adjustments.
Adjust printer head up to allow for thickness of PCB. (easy left and right set screw adjustments already on printer).
When finished with mod, the entire original case goes back on and looks great!
To load any PCB, simply tape a 2" leader with its right hand edge shifted 1" to the right (so the printer can pull the PCB through) ahead of your PCB to be printed. The reason for the use of the "leader" is because when we discarded the original vertical paper feeder we lost the ability to automatically feed the paper sheet into the printer. We cannot simply introduce our PCB target pre-staged under the paper feed rollers. The printer thinks this is a paper jam or misfeed and aborts printing. The leader and target PCB is so positioned before a print request is made to escape detection of the printer paper position sensors, yet allowing us to use the paper feed drive roller to pull in our target PCB at the required time (not to early nor too late is paramount).
Putting a simple "leader" strip on both the front and back of any size PCB affords the PCB traces to be printed up to the very edge on all four sides.
Since it is so easy to run the board again, I have be doing two passes [ed: heat curing the ink between each pass] just for insurance. I have not extensively tested single pass for competent fine lines.
I can not over state the importance of a quick pre-etching, pre-heating the PCB, and keeping clean the feed rollers. At such a fine line scale, a speck of dust reeks havoc on your traces!
See also:
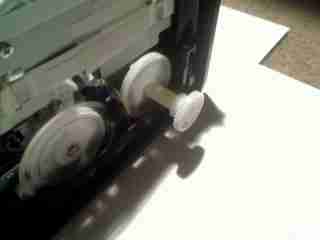
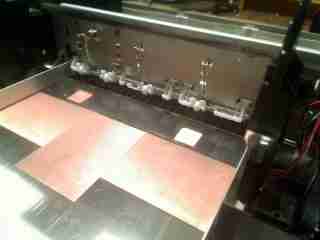
A nylon spacer and the discarded rear paper drive gear is used for fine manual
control of the paper drive rollers.

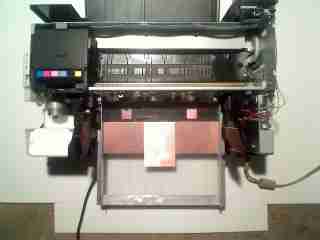
Finished rear feed bed mod.
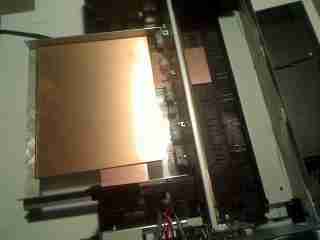
The tray is a little hard to see because it is made out of transparent
plexiglass. The PCB material you see is UNDER the tray and was used as support
only. Beneath the two 3/4" copper squares are the nylon stand-offs to set
the rear deck height exactly to the existing front deck. The other copper
PCBs are used for rear mid-deck support and leveling.
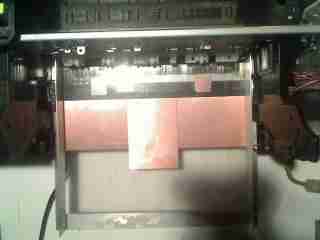
All sizes of PCB must be loaded against the left hand rail (viewed from rear of machine). Within a set target board leading edge pre-staged area (aprox. 1 inch long) ... anywhere within this area, the printer will find the PCB leading edge automatically for proper printing registration. All printing alignments including fine control of double sided registrations are easily set in KiCad, Word, etc.
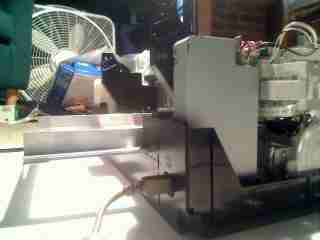
The entire mod is stationary, only your target PCB and leader strip move thru the printer.
Mod rear deck is 8 by 10 by 1/8 inch Plexiglas. Guide rails are aluminum 3/4 by 1/2 by 8.5 inch. (All the copper you see in this pic is under the plexiglas feed bed)
Printing a PCB: The small PCB (leader) is PULLING the bigger (target PCB)
into the feed rollers!
This pic is the finished mod with an 8 x 7 inch target PCB with an attached
(taped on back) leader strip PCB staged to be run through the printer. The
printer doesn't "see" the leader strip and is ignored.
The 2.5" x 3.5" leader PCB (taped underneath to the target board) pulls target board into main paper feed rollers(use the manual feed knob to draw leader into printer). Be sure leader is offset at least 3/4" from guide rail to clear paper sense switch. Also, manually set the target board's leading edge at least 1.5 inches back from feed roller's support frame.
REMEMBER: Always heat cure (dry) printed ink before sending printed PCB through printer again !!
Were the paper/PCB exits the printer, I have found that it is not necessary to remove the top pizza wheel traction roller assembly. (I originally removed this assembly so the top exit rollers would not walk over the still wet printed ink). If you simply use two small self-tapping screws thru the two existing holes atop the roller assembly to hold this roller assembly in a retracted up position allows your PCB to pass unscathed, yet still allowing the use of the front loading CD/DVD tray for the 2.5 x 3.5 inch PCB printing mod RE:(www.fullspectrumengineering.com/pcbinkjet.html) +
Questions:
Do you have any higher resolution pictures of the printer?+
I'm going to try and follow your instructions, but better pictures would really help out a lot.
Thanks!
Comments:
| file: /Techref/pcb/etch/Artisan50.htm, 8KB, , updated: 2014/1/16 12:13, local time: 2025/10/12 22:24,
216.73.216.53,10-2-207-162:LOG IN
|
| ©2025 These pages are served without commercial sponsorship. (No popup ads, etc...).Bandwidth abuse increases hosting cost forcing sponsorship or shutdown. This server aggressively defends against automated copying for any reason including offline viewing, duplication, etc... Please respect this requirement and DO NOT RIP THIS SITE. Questions? <A HREF="http://techref.massmind.org/Techref/pcb/etch/Artisan50.htm"> Direct to PCB InkJet Resist Printing Epson Artisan 50 by Richard Liberatoscioli</A> |
| Did you find what you needed? |
Welcome to massmind.org! |
|
Ashley Roll has put together a really nice little unit here. Leave off the MAX232 and keep these handy for the few times you need true RS232! |
.